HOW WE REMODELED THIS EDMONDS BATHROOM
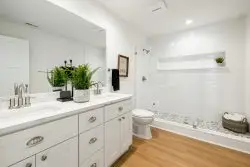
FROM THIS:

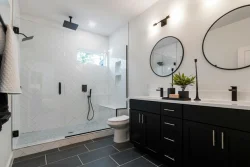
TO THIS

Have you been hating your bathroom recently? Do you want to improve it but don’t know where to start? There are lots of decisions that go into a remodeling project, and it can be overwhelming. In this project journal, we will explore the flaws in a bathroom in Edmonds, what we replaced, and why.
The best place to start in a remodel is to decide: what do you hate about your bathroom, and what will we be removing? In this case, everything. We decided to start from a fresh footprint. No actual plumbing or pieces were moved, which made it easy to decide where each bathroom fixture would go.
What are the problems in this bathroom?
1) The giant, triangular drop-in tub.

Drop-in tubs may have been popular to soak in at one time in the past, but not anymore. They take up unnecessary space and are bulky. This particular tub was almost the size of an outdoor hot tub and took up the entire corner of this bathroom. Not only is this tub massive, but it is also surrounded by an obnoxious, hard-to-clean tile deck. It was time for this whole monstrosity to go!
2) The small fiberglass shower

The old fiberglass shower in this bathroom was an eyesore. In this bathroom, everything was tiled in the same tile… except for the shower. When you have one cohesive material throughout your space, such as this tile, then bringing in something like a fiberglass unit can ruin the entire effect of the bathroom. These one-piece insert showers often “come with the home” because it is a quick and cheap solution for a shower. The shower being in this “cove” did not help how closed off the bathroom felt. The worst offender was the wall between the shower and the tub. This wall closed off the space, which contributed to the choppiness of the bathroom. Removing the wall also opened up more space to expand the shower.
3) The bulky vanity with a tiled top.

In the world of bathroom design, (and bathroom cleaning,) nothing is worse than a tiled countertop. Anyone who has tile knows that the grout is horrible to clean; and the smaller the tiles, the more grout lines are needed. Grout lines can lead to staining, and bacteria can get stuck in the crevices. It can be impossible to clean! Tile countertops can tend to chip, or badly installed tiles can even fall off the surface.
In addition to the tiled countertop, there are two drop-in sinks in this vanity. This is an old-style sink, where the sink is dropped down into the sinkhole. These can tend to get gunky around where the sink sits on the countertop, making it even harder to clean. Drop-in sinks are also bulky, adding even more clutter to the top.
The cabinet itself isn’t much better. It’s a nice size with lots of storage, but the deep brown color makes it look even bulkier and much clunkier than it is. The false drawer front is also split in half, adding more lines. This makes the cabinet fronts look crowded and continues the choppy look of the bathroom. The cabinet completely takes over the bathroom.
4) Tile choices

This bathroom had large tile floors, and the same tiles continued around the tub deck and onto the countertop. While the floor is probably the best place for large tiles, it makes for a very cold floor, and again, HARD TO CLEAN! Tile floors can be uninviting, and in this case, bland. Using the same tiles all around the bathroom can make the bathroom look TOO uniform. With no variation in the tile style and color, the entire bathroom becomes uninteresting.
WE REPLACED EVERYTHING…
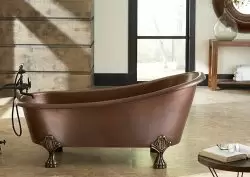
1) Starting with the tub

Replacing the drop-in bathtub with a more standard-sized free-standing tub was a no-brainer. However, the direction the tub was installed was not. The question was: “Do we install the tub diagonally, or flat along the wall?” The diagonal direction would have looked good but doesn’t help maximize space. We ended up going flat against the wall because it was the cleanest look.
A freestanding tub is a very contemporary option and offers more soaking space than a traditional alcove tub. This tub, and many other freestanding tubs, features a horizontal drain. When you’re on the hunt for a good soak, the horizontal drain is the best way to go. The higher the overflow, the more water the tub can hold.
Since we were working with so much space we didn’t have restrictions on the size and shape of the freestanding tub. We opted for a standard-sized tub, however, the shape of the tub is slightly abnormal. The tub is slightly wider at the top of the tub, and narrower at the bottom. This shape provides a more comfortable position to lie in.

When picking a freestanding tub, or any statement tub, it is important to think about what tub filler style you are interested in. This floor-mounted tub spout came with the tub, so it was an easy pick. The simple, straight look of this tub spout complemented the tub and the contemporary style throughout the bathroom. Some tub fillers are more elaborate, so it’s mostly your personal preference on what style to choose.
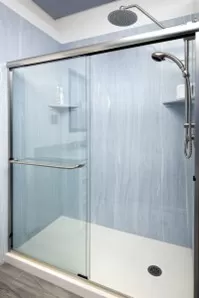
2) Removing the awkward wall- expanding the shower

The most noticeable change in the bathroom remodel was the removal of the wall between the tub and the shower. The absence of the wall completely opens up the space, changing the look of the entire bathroom. Removing the wall (and putting in a smaller tub) also allowed for the shower to be expanded. We decided to make the shower as large as possible and brought the walls out to the window, resulting in a luxurious and enormous shower. We also took the Engineered Stone surround to the ceiling. This complements the long veined look, making the shower look even taller than it is.
3) The rain shower head

A rain-style shower head adds that extra bit of oomph to your showering experience. The style we installed in this project is the Atlantis 16 Square, which features a flat neck and a square showerhead. When you are working with lots of lines, it’s important not to mix round with flat. Since we were working with a veined look for the Engineered Stone surround, a square system just made sense.
We also installed an Orca 2 valve in the shower system. The Orca 2 valve features an escutcheon plate with a diverter switch right above the temperature control handle, for easy access. Normally a diverter would be on the large shower head’s neck, which would require you to reach up to switch between shower heads. The Orca 2 plate allows for the easy change of which shower head is flowing. There being no diverter on the shower neck allows for a cleaner look with less metal to crowd the space.
4) The vanity

The original brown vanity was a perfect size, but because of the color and the cabinet/drawer arrangement, it took over the bathroom. We replaced the dark brown vanity cabinet with a Shaker-style, platinum grey vanity cabinet. While it is important to have a beautiful vanity cabinet, it is just as important that the cabinet doesn’t take over the entire bathroom, as the previous cabinet did. The pulls on this cabinet help accomplish this by being uniform throughout the cabinet. The pulls are also flat instead of round, which is a small detail that helps continue the contemporary look across the entire bathroom.

For the Vanity top, we continued the same veining and color throughout the countertop, for a unified yet interesting look. We also opted for rectangle under-mount sinks, continuing the square look throughout the bathroom. Undermount sinks, as their name suggests, are mounted from inside the cabinet, instead of dropped in like the previous sinks. This results in a cleaner look on the top, with it being completely flat.

The rectangle shape continues straight into the sink faucets. There is a slight arch in the spout, but the overall look of the faucet set has a very angled look. We went with an 8” widespread faucet with two handles. When you have such a spacious vanity top, it is best to use a wider faucet setup.
5) Flooring

When picking bathroom flooring there are lots of things to consider. Waterproof is at the top of the list. Tub Cove primarily installs Luxury Vinyl Plank Flooring. This is a scratch-resistant and waterproof choice, making it an easy pick for the bathroom. It comes in a huge variety of colors and styles, including wood plank and tile. We had picked the Castle Black Slate color, for the tile look, without the tile maintenance. In a large bathroom, a darker floor brings some interest and richness to the space, while still complimenting the rest of the bathroom. Having a darker color on the floor helps to ground the rest of the space.
6) Lighting

Lighting in a bathroom is one of the details that most people tend to overlook. Having the right lighting in a bathroom is important because it sets the ambiance for the entire bathroom. A light that’s too bright or fluorescent can make the bathroom feel stiff and uninviting. Lighting that is too yellow can age and alter the color of the bathroom. For a contemporary bathroom like this, a simple, non-intrusive, light fixture was picked. The light it produces is soft and neutral, which shows the true color of the Engineered Stone and complements the style of the rest of the bathroom. The square theme in the bathroom is also continued through the shape of the light fixtures.
7) Toilet

The toilet is a small part of the bathroom that the majority of people overlook. Most people tend to have the opinion that “a toilet is a toilet”, which can be correct. However, if you update the entire bathroom, and have an old toilet, then the toilet will stick out like a sore thumb. While there are incredibly elaborate toilets are the market, we opted to go with a simple one-piece toilet.
8) Small details

Now that all of the main bathroom fixtures are replaced and updated, it’s time to focus on the small details in the bathroom. Similar to the toilet, if old small items are left after the remodel, then they will be more noticeable than ever. Sometimes this includes painting the bathroom, however, for this project, the walls were left unpainted. We did replace the toilet paper holder, towel rings, and bars, as well as the light switches and plates. Smaller items like these are almost always left untouched.
Conclusion
Bathroom remodels are in-depth, but there are ways to make them more manageable. Isolating the problems with the bathroom and how to fix them is always going to be the best way to start. Tackling the bathroom one part at a time makes it much more manageable as well. But if you need more advice, Tub Cove is here to help!